Trying to sit up perfectly straight all day can feel tiring. Your spine is meant to move, not stay stiff!
Instead of forcing a “perfect” posture, try changing your position throughout the day. This can help keep your neck and lower back comfortable.
3 Small Habits to Try Today
The Sofa Cushion Trick: When relaxing on the couch, we often sink into the seat, which may feel uncomfortable after a while. The Fix: Sit back comfortably and place a small, firm cushion behind your lower back. Keep your feet supported and adjust the cushion until it feels comfortable.
The Eye-Level Phone Lift: Looking down into your lap to read your phone for long periods can strain your neck muscles. The Fix: Bring your phone up closer to eye level. Support your elbows on an armrest or cushions so your arms feel supported and your shoulders stay relaxed.
The Gentle Shoulder Roll: Staying in one position for too long can leave your neck and upper back feeling stiff. The Fix: Try taking a short movement break every 30 to 60 minutes. Stand up, walk around a little, take three slow, easy breaths and gently roll your shoulders backward three times. These small movements may help ease tightness.
Keep the movements comfortable, and stop if they cause pain.
Wellness Corner
Sleep Better in 7 Days: Small Changes That Help
If you are sleeping for 7 or 8 hours but still waking up feeling tired, your sleep might be getting interrupted without you realizing it. As we get older, sleep naturally becomes lighter. The good news is that small, daily adjustments can make a big difference in how deeply you sleep.
Instead of trying to change everything at once, try this gentle 7-day plan:
Step 1: Days 1–2 — Get Morning Sunlight What to do: Step outside for 10–15 minutes of daylight shortly after waking up. Why it helps: Morning light sends a clear signal to your brain that the day has started. This sets your body’s natural internal clock so you feel naturally sleepy at bedtime.
Step 2: Days 3–4 — Give Your Digestion a Rest What to do: Finish your dinner 2 to 3 hours before going to bed, and keep tea or coffee to the morning hours. Why it helps: Going to bed on a full stomach makes your body work on digesting food when it should be resting and cooling down for deep sleep.
Step 3: Days 5–7 — Create a Peaceful Bedtime Space What to do: Keep your phone away from your bedside, and cut down on large glasses of water or tea late in the evening. Why it helps: Checking a bright screen if you wake up at night wakes your brain right back up. Reducing late fluids also limits disruptive middle-of-the-night trips to the bathroom.
A Gentle Reminder: Focus on just one small change every two days. Good sleep is not about forcing yourself to rest—it is about creating the right environment so sleep comes naturally.
Yoga Basics
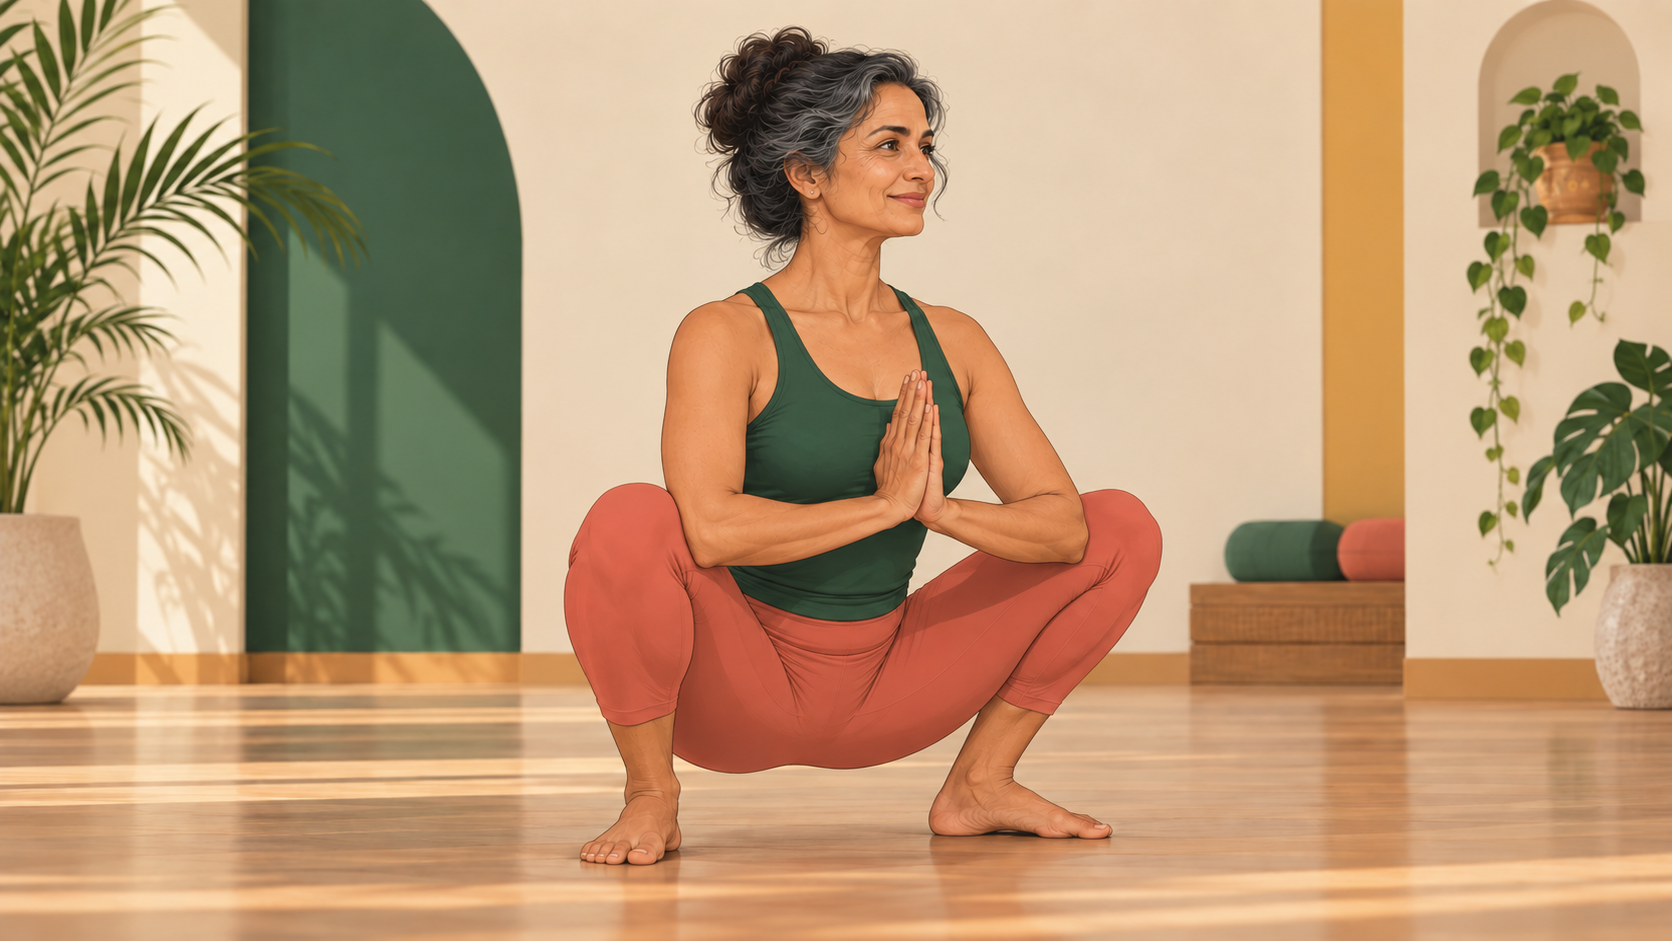
How to Practise Malasana (Yogi Squat) Without Knee Strain
by Shwetha R, Lead Teacher, Yoga Circle
Malasana, or Garland Pose, can help improve flexibility in the hips and ankles. But going too low or forcing the knees can cause discomfort. Use a chair or support and practise within your comfortable range.
Step-by-Step Guided Practice
Set Up Your Foundation Support your heels if they lift off the floor. Stand with feet a little wider than hip-width apart, toes turned out at a comfortable angle. Adjust the width to suit your body. If your heels lift as you squat, place a firmly folded blanket or the folded edge of a yoga mat under them so your feet feel supported.
Use Support for Entry Support helps you lower yourself with more control. Hold a fixed surface in front of you, or the back of a sturdy chair that cannot slide or tip. Inhale to gently lift your chest, then exhale as you slowly bend your knees and lower your hips. Go only as low as feels comfortable.
Keep Knees in Line with Toes Let your knees point in the same direction as your toes. As you lower yourself, keep your knees pointing in the same direction as your toes. Avoid letting them drop inward, but do not force them outward. Adjust your foot position or stay higher if needed.
Maintain a Tall Spine Use support under your seat if a full squat feels too intense. Keep your chest gently lifted and shoulders relaxed. If you need support, place a stable yoga block or sturdy stool behind you before you begin. Lower yourself onto it at a comfortable height. You do not need to bring your hips close to the floor.
Breathe normally, then use your support to rise slowly.
Quick Fixes
Heels lift off the floor: Place a firmly folded towel or blanket under your heels.
Knees drop inward: Stay higher, adjust your stance and use a stable support under your seat.
Pinching at the front of the ankle: Hold your support and keep your hips higher. If the pinching continues, come out of the pose.
Stop if you feel pain in your knees, hips or ankles.
Managing Anger: Create Space Before You React
by Shruti Patawari, Psychologist
Many of us were raised to believe that feeling angry is bad or something to hide. But the truth is simple: Anger is just an emotion, not a behavior. Feeling angry is a natural response; what matters is how we listen to our body when it happens.
What Happens To Your Body When You’re Angry?
Your jaw clenches and your shoulders creep up toward your ears.
Your heart beats faster and warmth or restlessness spreads through your chest and neck.
Your breath becomes shallow and speeds up.
Your focus narrows, creating an urgent inner pressure to react or speak right away.
The 2-Minute “Pause & Calm” Practice
Pausing is not suppressing anger. It gives your nervous system a moment to settle.
Sit comfortably with your feet on the floor.
Unclench your jaw and drop your shoulders away from your ears.
Breathe in slowly through your nose, expanding your belly.
Exhale completely and repeat for 4 to 5 rounds.
Notice what shifts in your body before you choose your next move.
A Gentle Reminder: The goal is not to never feel angry again. The goal is simply to notice when anger arrives, give your body a moment to breathe, and respond from a place of peace.
Celebrating the commitment, consistency, and effort it took to get here.
Sangeetha
Preeti Ramnani
K S Sarala
Sheila Rajan
Angrej Singh
Annie David
Priyanka Vyas
Ranjiny Nair
Rizwanaajmeri
Nilima Patel
Keya Das
Fahima Toma
Anitha Kulkarni
Nahida Tabassum
Indu Sharma
Y Malti
Kunal Jethwani
Vitthaldaa
Babita Deora
Mongincy John
Jagdish Rayka
Savita
Surbhi
Hema Chandrasekar
Vinaya K
Sushila Pokhariyal
Priya Rai
Indu Prasad
Rachna
Pratiksha
Deepa Talreja
Poornima
Pushpa
Rakhee Kulkarni
Jai
Neha
Sunita Sinha
Anusha K M
Ashu
Rubina Bhattacharya
Nutan
Anuradha
Anupam Mukherjee
Vysuresh
Abha Sharma
Alpa Makwana
Kanak Sharma
Jayakantha
Sarita Agrawal
Naina Vasant
Anusuya Ghosh Nath
Madhulika Pant
Kiran Singh
Ashita
Community Voices
Lalitha Abdul Fathak
Manasi Malaviya
Recipe Corner
High-Protein Vegetable Upma With Moong Dal
Ingredients
½ cup semolina or rava
¼ cup yellow moong dal, washed and soaked for 20–30 minutes
1 cup mixed vegetables, finely chopped
1 small onion, chopped
1 tomato, chopped
1 green chilli, optional
1 tsp mustard seeds
½ tsp cumin seeds
1 tsp grated ginger
1 tbsp oil
2½ cups water
Salt to taste
Fresh coriander and lemon juice
Method
Dry roast the rava until lightly golden. Keep aside.
Heat oil in a pan. Add mustard seeds, cumin, ginger and green chilli.
Add onion and cook until soft. Add tomato and vegetables.
Add the soaked moong dal, salt and water. Cover and cook for 8–10 minutes until the dal and vegetables soften.
Lower the heat and slowly add the roasted rava, stirring continuously to prevent lumps.
Cover and cook for another 3–4 minutes until the upma becomes soft.
Garnish with coriander and lemon juice.
Why It Is Good for You
Moong dal adds protein and fibre, while the vegetables provide colour, vitamins and volume. Together, they make regular upma more filling and nourishing than a rava-only version.